Tuesday, February 12, 2013

For the Bernina Girls ... No. 55 Leather Roller Foot

If you like sewing circles or curves, the 55 Leather Roller Foot is a must have.  I love this foot and use it often.  I don't know if other manufacturers have an equivalent foot, but if you're a Bernina girl, you're in luck.

I like circle quilts.

The 55 leather roller foot naturally likes to sew in a circle.
We were meant for each other.

I use the freezer paper method for piecing circles
and this foot allows me to keep the freezer paper in place while piecing
so my circles are perfecto.

I also like quilting in circles.

Another perfect use for the roller foot.

I do start out with an open embroidery foot when doing circles.

Because the circle is so tight at the start, I free motion whip it around
to start the spiral, and then change to the roller foot.

The leather roller foot is a little difficult to find,
but I think most dealers would order it for you.

This foot was a Happy Birthday to Me present one year. 

I give myself the best presents.

A little video presentation from Bernina on the 55 foot ...

Video Courtesy of Bernina International

Wednesday, February 6, 2013

CowGirl and CowBoy Up! ... A Country Lone Star Quilt

The Lone Star Quilt has been beloved by many generations of quilters, this quilter included.

This quilt is nine small Lone Stars ...
so I guess it's actually a constellation!

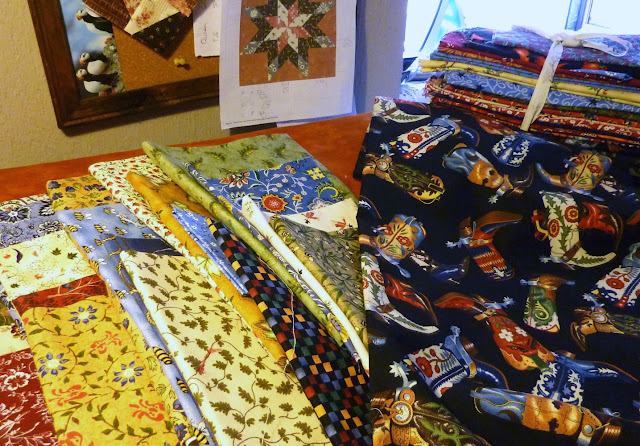
The pile o' fabrics collected for this quilt ... all the colors
were pulled from the colors in the boots


The stars are set on a background of two different rust color fabrics.

I am a BIG fan of color.  I think it's my favorite part of quilts and quilting.
I especially like the pops of blue against the rust.

The star points are outlined with a long curved line.  I like the effect.

And I put booboolah's in the center of each star.
I don't know if they have a real name, but I call them booboolah's.
They are little 1/2 inch yoyo's I guess.  I used them on my New York Beauty Christmas quilt too.

Some more of the quilting and fabrics

In the four large rust squares in the center, I did a motif using a paper pattern.

Quilters, Do Not, I repeat Do Not use tissue paper for this technique.
Use Wax Paper ... it tears away really easy.  Tissue paper, not so much.

Print out the quilting motif you want,
then layer sheets of wax paper under the motif.

Follow the lines of the motif with your sewing machine (un-threaded!).  The pattern is punched through on the wax paper and works spiffy-do.
I hate marking a quilt, but this method I really like.

The finished motif ... after picking out all the little bits o' tissue paper!

I used the back fabric as the binding by folding it to the front.
I love doing bindings this way and it is the way my grandmother did the binding on the Sunbonnet Sue she made all us girls for Christmas one year.  It looks and feels wonderful.

But ... I was just finishing top stitching the binding when
I saw, I had cut the binding with my rotary cutter.  My heart sank.

I saw my only option at this point was to patch.
And this quilt is so nice, with so many special touches.
I guess the patch on the binding just needs to be another special touch.

I matched the fabrics and appliqued stitched the patch down.
And then hand quilted.  The patch ain't going anywhere ... and I think it
blends in just fine.

Cowboy and Cowgirl boots are the border.

This quilt is available on Etsy, special OOAK patched binding and all.

It is a truly nice quilt.


https://www.etsy.com/listing/122899295/western-cowgirl-cowboy-throw-lap-quilt


Saturday, February 2, 2013

Quilts, Patterns and EQ7

I had an inquiry if I would sell the pattern for my pink and brown Bear's Paw quilt.  At this point I'm not selling patterns ... it makes my head spin thinking about writing a pattern!!


But I am providing the bare bones pattern and how to for this quilt with the help of EQ7.  Heidi, this is for you ... and anyone else who might be interested.

I'm thinking you can right-click and save the pictures as the 'pattern' ... don't know how user friendly this format will be.  Let me know!

I am a BIG fan of Electric Quilt software and have been using it for a long time ... started with EQ5, upgraded to EQ6 and my Christmas present to myself this year was an upgrade to EQ7.

I can't imagine quilting without it ... I learned early in my quilt life that I should not do my own math (see post of The Christmas Quilt from Hell).  All the pics below are done in EQ

The Layout
Finished dimensions 89 x 89

The Blocks are 10 1/2 inch finished.  An odd dimension but I chose this size because all the pieces are cut in nice even dimensions, no 1/8th inch nonsense.

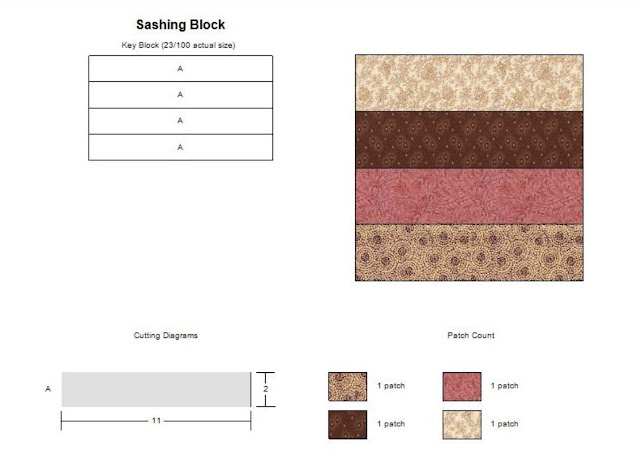
The Sashing is 6 x 10 1/2 and the Sashing Corner Blocks 6 x 6

There are 13 Bear's Paw blocks.

... and 12 modified Irish Chain Blocks

There are 60 sashing blocks.

Sounds like a lot (it is!) but they go fast if you sew 42/44 inch strips together, then cut the needed 11 inches.

And finally 36 Sashing Corner Blocks ... a 16 patch block

Instead of cutting all those 2 x 2 squares ... these go faster

sewing the 42/44 inch strips together by 'column',
then cut 2 inch 'columns' to make the sixteen patch.

EQ provides a yardage guide.  I don't use it very often, usually only if I've got a limited amount of 1 fabric and need to know if I'll have enough.

This quilt calls for 11 3/4 total yards of fabric.  EQ estimates high I think, but it gives you an idea of what's needed.

Another option ... the same blocks, only set on point.
Finished dimensions 93 1/2  x  93 1/2

I absolutely love on point quilts, especially Bear's Paw quilts.

The number of blocks changes:  16 Bear's Paws, 9 Irish Chains, 64 Sashing, 24 Sashing Corners, 16 large triangles for the edges, and 4 small triangles for the corners.

The only changes to the block dimensions are at the edges ... the cut off sashing corner blocks have additional dimensions to cut, and of course the on point fill blocks.

The cut off Sashing Corner block for the edges

The LARGE triangles to fill at the edges

Note:  I updated the dimensions of this block ... I had the wrong pic.  Apologies.


And the SMALL triangle to fill the corners.

Note:  I updated the dimensions of this block ... I had the wrong pic.  Apologies.

... and the yardage.  1 yard needed for the on point fill block.
Total yardage called for is about 12 1/2 yards.

There are pics of this quilt posted under Mo' Pics of my Etsy Quilts ... it is for sale and awaiting it's new home.