Showing posts with label Chez Moi. Show all posts

Thursday, May 23, 2013

Dawson Brothers 1906 Fireplace Insert

I recently had to do some restoration work on the firebox of my beautiful 1906 fireplace insert.  When I pulled it away from the fireplace, I found a stamp in the back that it had been made by "Dawson Bros - Chicago, Ill".  I did a wee bit of research and found a picture of the the Dawson Bros building in Chicago which I posted on Pinterest so I'd know right where to find it.


I didn't think anyone but me would be much interested in the Dawson Bros building, but Beth found it.  The Dawson Brothers were her Great Grandfather's brothers.

So Beth, this post is for you ... these photos are a right-click away for your collection of your Great Uncle's work.

The insert in all it's glorious detail.

It is a coal burning fireplace ... the firebox is very small
and with the solid front, designed to burn coal long and slow.

It was made in an era of fine detail.
No surface is left unadorned.


Detail of the 'door' which lifts off to reveal the firebox.
The pastoral scene is done in heavy relief

So sweet ... she is wearing
sabots on her feet.

The makers stamp is in a place that it cannot be seen unless the
insert is removed from the fireplace ... a modesty lost with
today's marketing practices.

And a separate plaque for the grate
Vulcan Series Grate No. 422

The complete fireplace a la 1906.

It's a wonder that after 107 years it is still all
in place as it was in 1906.


Monday, January 14, 2013

Remodeling a 1906 Kitchen ... and The Window of my Dreams

I knew what I wanted ... a window sill.  And French style panes.  And a window that opened out, all the way out.  But no one made it.  So I had to make it myself.

This is my kitchen window, and it is the window of my dreams.

It has lots of wide open time all summer.

And I love the window stay closures.  They're antique from England.

This is the window I replaced.  No sill for little vases of Lily of the Valley.
No panes. No big wide open.

And a note to anyone getting new cabinets that happens to be a ClutterBug,
just say no to the little shelves on the side of the cabinet.

They will make you crazy.

Bye Bye old window.

My personal motto is

"I don't know I can't do it until I try"
When I looked at this gaping hole, I had a moment of doubt.

But eh, I just went and got the sawz-all and made the gaping hole bigger.

This is how the window looked for a good part of that summer.
The hole was cut before I found what was going to go in it.

The original 1906 window came nearly down to the floor.  A wood cook stove
was where the gas stove is now, and a sink was on the left.  The cook stove
chimney was removed long ago, but a patch in the bead board ceiling remains where the chimney was.


Mine is the 2nd remodel of this kitchen ... the oak cabinets were
put in two owners ago as well as the window I replaced.
I was so happy to be visited by her one day.
She said the original sink was still in place when they moved in and it was set so low she had to sit on a stool to do the dishes.

The first mistress of this house was a very petite French woman, Sophie Bergeron.  Perhaps the sink was set at a custom height for her.

I finally found the window of my dreams at a salvage yard.
$25 if I remember right.

I didn't yet have anyway to keep it shut ... so a shoe lace, a wood spoon
and a screw worked just great for a few weeks.


I did take it on faith that during this big-hole-in-the-house process
that there would be no big rain storms.  Or people with bad intent. 

Of course the window of my dreams wasn't tall enough.
So I built in a transom light.

Almost done.  Transom in with the original window top casing board in place.

Getting this window done was part of getting new cabinets too.
The wall cabs are down, and the sink is temporarily back in use.

This is what started with whole remodel and the new window project ...
that GAP between the cabinets and the stove.


I wanted some counter top in that little eighteen inches next to the stove.

I call my kitchen the wide spot in the hall.  There isn't much room.


But what the kitchen lacks in space and counter tops is
made up for by a fabulous walk in pantry just off the kitchen.

My kitchen is lovely now.

That eighteen inches of counter top made all the difference in the world.


It may be a teeny tiny kitchen, but it's a well appointed teeny tiny kitchen.

There is a dishwasher to the left of the sink ... thought in such a small space it was worth the extra cost to hide it with a custom panel.

And I love the little pull out ... keeps flour and sugar handy ... and it's the only thing that would fit in that last bit of space.

The backsplash was the last detail to get done (by about a 1 year lapse).

It is two pieces of fancy trim molding from Home Depot ... an egg and dart piece sits on top of the carved piece of molding.

Both pieces were stained and then sealed with wipe-on polyurethane 

And for the quilting part of the window story, I made a little basket valance to keep the sun out of my eyes while doing dishes ... it's a south facing window.

The valance gets a little stained glass affect
when the sun comes through.
Very cheerful.
The before window ...

... with the magnificent Queen Elizabeth Rose that I planted in front of the window so I would always have roses in the window in the summer.

Queen Elizabeth will grow as tall
as you let her ... the rose is now all the way up to the soffits.

The window after ... I just love it!

... and roses in my window.


Wednesday, October 3, 2012

Aunt Susie's Scrapbooks

I am the keeper of Aunt Susie's scrapbooks.  Aunt Susie was my great great grandmothers sister.  She made scrapbooks for her niece Mary, my great grandmother and her nephew Horace, my great grandmother's brother.

Front of my Great Grandmother's scrapbook

Front of Horace's . . . the loveliest little fabric

Besides the family history, what makes these scrapbooks so unique are the fabric pages.

Mary's pages are silk with red bias tape.  Horace's pages are I think a cotton and are bound with blanket stitch. They are both so beautiful.

Both scrapbooks have fabric covers, and are bound by hand with red silk ribbon.

The first page . . . 'Good Morning', with a portrait

Aunt Susie's signature page in Horace's book . . .
and testimony to the love between the sisters

Mary's scrapbook . . . The fabric is a single layer
of silk and the pages are different colors.

Horace's pages.  The pages are a single layer of fabric with a beautiful blanket stitch.  I think the fabric is a very fine cotton.

Die cut lettering on a page
dedicated to American authors.

These die cut letters are amazing . . . each with classical figurine

Detail of die cut roses and the silk binding

Detail of blanket stitching and a fabulous die cut ship

Die cuts and cuttings from publications.
I love Aunt Susie's sense of composition

A page dedicated to Abraham Lincoln.
Horace's scrapbook is done with
each page a letter of the alphabet.
Mr. Lincoln's page is V . . . victory over those who enslave another.

Tribute to the memory and achievements
of Abraham Lincoln
in Mary's scrapbook too

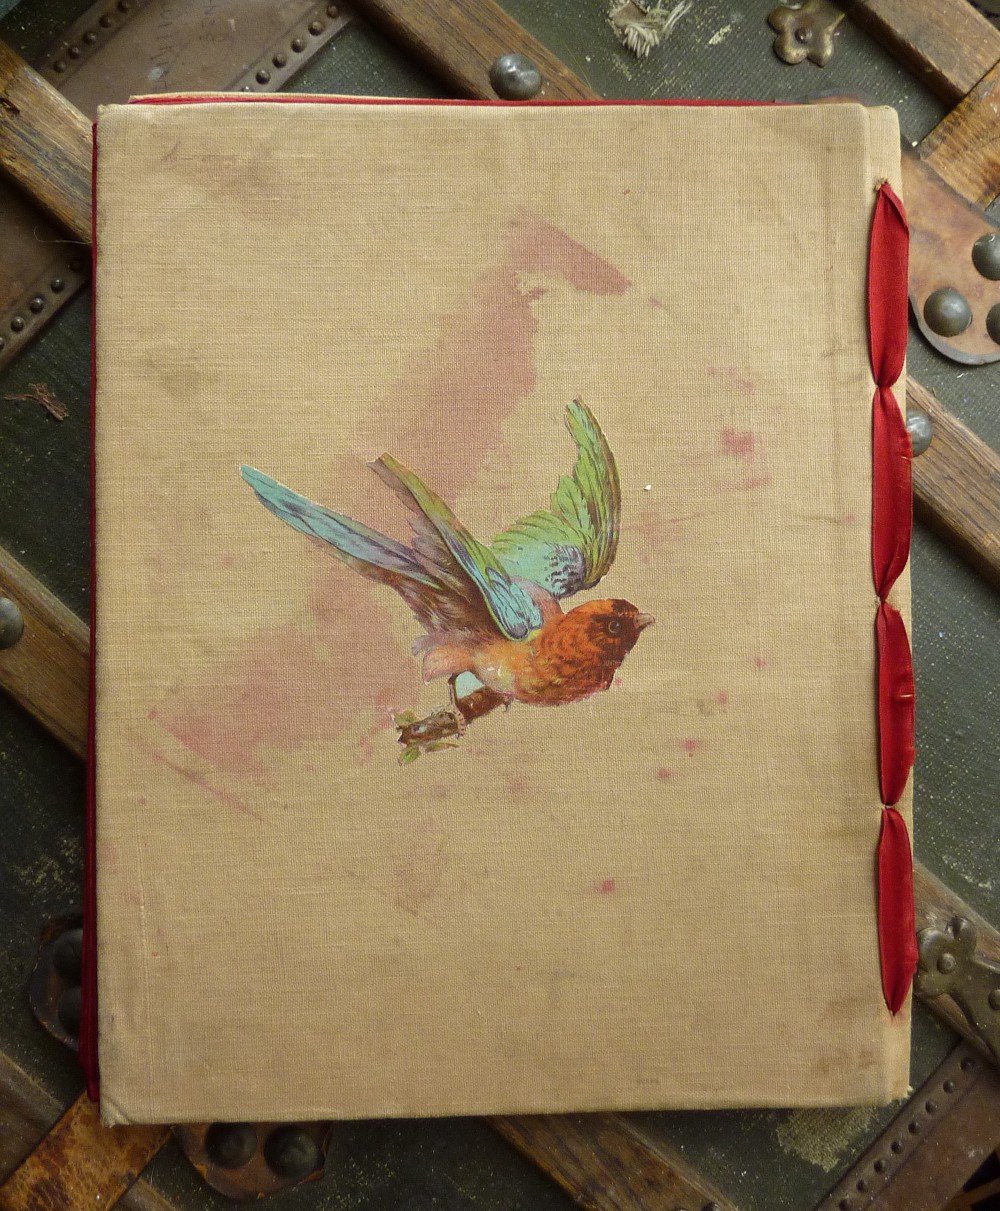
The back of Mary's scrapbook
She is given wings to fly

Friday, July 13, 2012

The July Garden in Bloom

Matilija Poppy
This is by far my favorite flower in the garden.  It has a soft sweet fragrance in addition to it's happy clownish look-at-me flowers.  Also known as the fried egg flower.

It is unabashedly intrusive in my Pacific Northwest garden . . . and I give it full reign to do whatever it wants.  I've had to tie up some of the branches which had flopped onto the grass.  It has completely surrounded the Graham Thomas rose Evelyn . . . which I will rescue this fall.

Very Blue Lacecap Hydrangea

Blue is an elusive flower color in the garden but if  you can grow hydrangea's you have blue!  The soil in this area is just right to maintain blue without amending the PH.

Cecile Brunner rose . . . not the climbing variety.  This is planted in front of the playhouse and doesn't get as much sun as she should, but seems to bloom just fine.  I love the perfectly formed itty bitty buds.

There isn't much room in the yard for a vegetable garden that gets enough sun except this little strip along the house.  Making the most of the little spot, there are 4 heirloom tomato plants which are doing splendidly, and 3 poles of Blue Lake beans.  The tomatoes are indeterminate so when everything is in full fruit, it's quite a jumble.  I've never planted winter crops, but this year I'm going to plant a winter crop of collard greens in this area once the tomatoes and beans are done.

A little malformed yet very delicious strawberry.  Yes, that's an antique toilet that it's planted it.  There are 3 antique toilets in the garden with strawberries.  They are in a too shady part of the yard for strawberries, but a few malformed berries are better than no berries at all.

Cuban Oregano (plectranthus amboninicus).  This is new to the garden this year and is in a container as it is tender and I want to bring it inside for the winter.  Isn't it cheerful!  It is mulched with cocoa hulls.  The little start was from a piece that broke off and rooted readily without any more effort than sticking it in the soil.

Saturday, June 9, 2012

The Stash: Making sense of all that fabric

If you quilt you have a stash.  If you quilt and have a collector's heart you have a BIG stash.  I swear I have enough fabric for 5 quilters for 5 lifetimes.  I look at my stash and ask myself "what were you thinking".  There are 6 bookshelves stuffed full.  I am on fabric restriction.


This brings the next challenge, making sense of it all.

1) The fabric needed to be readily accessible so I could 'audition' fabric for whatever I was working on, so shelves were for me.

2) Putting the fabric back on the shelf in a tidy fashion without fussing was important.  Whether by nature or nurture, I'm not a tidy person, I'm a clutterbug.  I need easy systems that I don't have to work at all the time.

A bundling system developed . . . and it works!


All the yardage is folded the same (selvage to selvage twice so it is 4 layers, and then folded up the length of the fabric so each piece is roughly 11 inches by 8 inches). Selvage trimmings are used to tie the bundles.

This open storage bundling system works well for me.  Everything is easily found and resembles tidy.  And most importantly it is easy to keep organized after rummaging through the stacks.

Three quarters of the stash is bundled by project. When I'm ready for a new project, I can grab a bundle, take it to the computer and draft the project in EQ (I love EQ!!).


The rest of the fabric is bundled by color.  When 'shopping' for a fabric for a project, it is easy to grab a bundle and flip through to find a fabric that works.